
First, thanks Jen for allowing me to guest post here, it's honestly, such an honor! Many of you know me from MasterPiece Weddings, and you know I have a passion for all things wedding, and personally for baking. I am always challenging myself in the kitchen! My husband and I try to eat locally grown and organic as much as possible and my baking reflects my passion for organic foods as well. So when I made a birthday cake from Harrison (my best friend's 4 year old son) I knew that it needed to fun and cool, but also organic. His mother works for Hain Foods, so it would almost be an insult if it didn’t!
I know a lot of women are attempting to make their own wedding cakes, and it's a lot of work, but totally worthwhile in the end! This was my second attempt at using fondant, it's not an easy material to use, so definitely practice first.
(This is Melissa's personal sketch! It's so cute!)
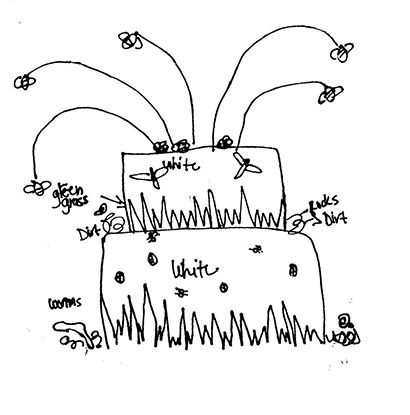 Step One: Have an idea, a sketch of what you would like to have the cake look like in the end, if it's not a sketch, have a picture for inspiration. Know in your mind that this is do'able {or not} Don't be afraid to buy a book or a manual on how to decorate a cake. Or use an online source.
Step Two: Test Recipes. This is the hardest most cruel part – I mean, really, testing cake recipes, sheesh! But seriously, if you are going to use a box, no one will know – just doctor it up a bit with a box of pudding! But also remember that if you are doing a tiered cake, how much batter are you going to need? I filled my cake pan 2/3 full of water and then poured the water into a measuring cup to know exactly how much in cup’age – I would need in batter to fill each cake pan 2/3 of the way full.
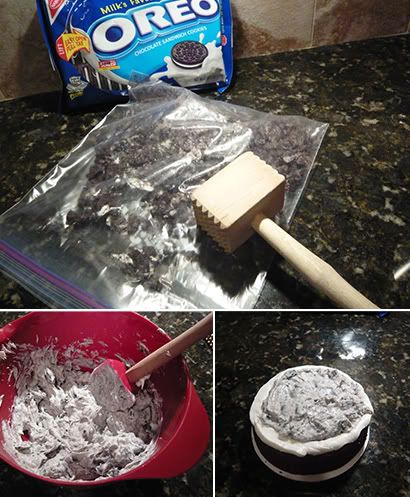
Step Three: Now that you know what kind of cake you are making, think about what you are using as the filling. For this cake I used Oreo Cookie and Cream Filling {with real Oreo's not Newman's Own… although I wanted to, the ones at the store were stale} I mixed 2 cups of roughly beat up Oreo’s with equal parts frosting.
Step Four: Determine how many tiers you are using, and buy those pans – I made a 2-Tier cake, it fed 40 people. I used a 12 inch cake pan and an 8 inch cake pan. Buy dowels so that you can make sure the first layer has enough support. And doesn’t fall through or sag the layer underneath it.
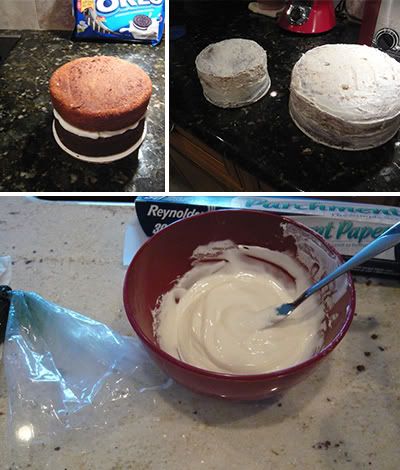
Step Five {Day 1}: Bake your cakes, this might seem like it happens last, but really, it's just the beginning. After the cakes come out of the oven, let them cool while in the pan, and then once they are completely cool, wrap tightly in cling wrap. Then refrigerate overnight.
Step Six {Day 2}: Lay out your cake on a cake card-board cut about ¼ inch larger than the tier of cake. Then, spray the cake with simple syrup, or brush with your favorite liquor. Then take white icing and pipe it around the layer, and fill the inside of the area with your filling flavor, this prevents the filling from seeping out the edge of the cake. Then take the top of the layer and set it on the top of the filling and give it a light press. You want to make sure it's level at this point. So take a clean level and place it on top of the cake {I used a piece of cling wrap and set that on top of the cake, and then set the level on top of that} and then cut the cake top until it's completely level. If this is the bottom layer, stick the dowel in there and mark it with your finger or an edible maker so that you know where the top of the cake is, and cut 4 or more dowels {for a 12 inch cake} at exactly the same length. And stick them into the cake – so that when the next layer sits on top, its level.
Step Seven: Do the same with the additional layers. Also be sure that the sides aren't sloped and if they are take a clean kitchen sheer and cut with scissors so that there is a 90 degree angle to the cake.
Step Eight: Crumb Coat… you take a thin coat of Butter Cream {or frosting} and coat the cake(s) so that you can almost see through the cake, still making sure they are level, then place your unwrapped, but crumb-coated cakes in the fridge.
Step Nine {Day 3}: Take your cakes out of the fridge add extra Butter Cream {or frosting} to the cakes, about an 1/8 of an inch thick all around ensuring your edges stay crisp.
Step Ten: If you are using fondant, then color your fondant, first work the fondant in your hands to soften the fondant, then put a few drops of icing coloring to the fondant and work it, and work it, until the color is completely uniform all around.
Step Eleven: Then roll out the fondant {for the round cakes} with a large heavy rolling pin or a fondant roller. It's a tough job, and you'll get your exercise, you'll want to roll the round about one foot plus bigger on all sides. Rolling it to about 1/8 of a inch thick.
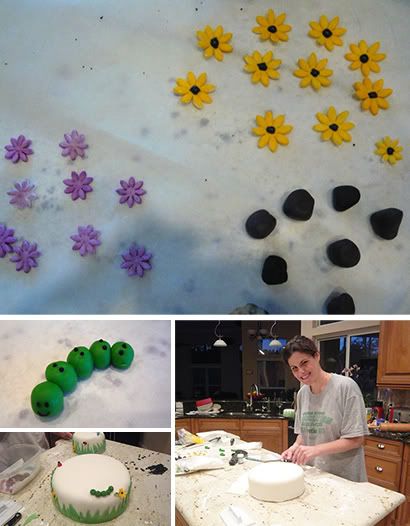
(Melissa looks fabulous even when she is half covered in flour.)
Step Twelve: This is the scary part, roll the fondant sheet up around the rolling pin, and then carefully drape the fondant over the cake. At this point you need to make sure the fondant isn't folded, pleated, and is smooth, definitely use a fondant smoother. And smooth, smooth, smooth!
Step Thirteen: When it comes time to layer your cake, especially if you are transporting the cake, to avoid disaster, don't layer them ahead of time!!! When you arrive at your destination just slide the cake(s) into place and don't use royal icing to stick the layers together, just let them stay, they won't sink because of the dowels. It'll be beautiful and perfect! I promise!
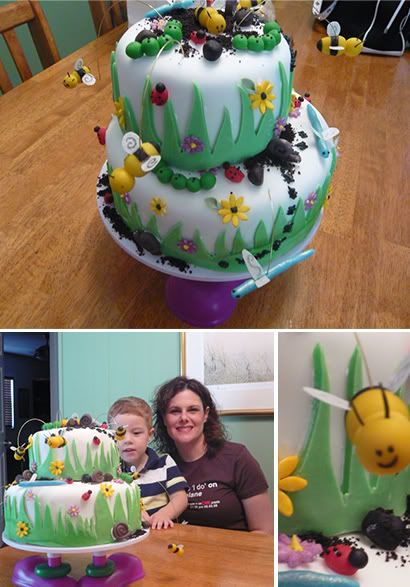
Then it comes time to decorate your cakes, you can use royal icing in a stencil, or make embellishments like I did (bugs)… but really go at it, have fun! Let your personality shine through! If you are "sticking" things to the cake, use royal icing, it works like super glue, but it's edible!
(And Voila! That's one awesome cake!)
If you have any questions, I am certainly not an expert, but I'll be more than happy to help! Email me: Melissa {at} masterpieceweddings {dot} net or leave a comment here on Earth Friendly Weddings! Thanks again Jen for having me, this was a lot of fun!!!
4 comments:
Oh Melissa, thank you for this awesome tips! It looks so easy this way! I'll be using a lot of them in my next cake. xo
This is very impressive! I thought about trying my own fondant peonies for my cake- but I'm not nearly talented enough. For now I'll just live vicariously through your beautiful posts! :)
That is the coolest cake I have ever seen!!! You suppose she'll do my 40th birthday? hee-hee.
I love that she did a sketch first.
Amazing, thanks for sharing
Great tips. The cake lookss realllyyy goooodddd!!!
Damn my diet!!! Now, I want cake. . .thanks! lol.
Post a Comment